Palm Free again, its the way to go!
This one is a replacement for my White Chocolate & Strawberry Gateaux, inspired by Twiggy from FuturePrimative http://futureprimitivesoap.com/ and thank you to Twiggy for allowing me to use her ideas especially the one about making dark, thin lines around your layers and embeds. I'm happy with the initial results and it smells fab. Same scents as before (Chocolate Truffle from Gracefruit and Strawberry from The Soap Kitchen), the balls are rebatched and scented with Strawberry, the bottom layer is chocolate, middle layer plain white and top layer dollops of all 3 swirled together.
Its curing well and is already nice and hard, again a bit sticky out of the mold but my palm free experiments are getting better. I hope you like it.
Followers
Thursday, 15 April 2010
Thursday, 8 April 2010
Summertime! I love Tip Nut
Great tips for grilling shrimp already, got to think she lives in hotter climates than UK lol
but still, have a look it makes you think of summer..... it has been a lovely day here in South Devon too, could this be the shape of things to come? http://tipnut.com/grill-shrimp/
Carry on and look at my last posts, need new names and feedback....
but still, have a look it makes you think of summer..... it has been a lovely day here in South Devon too, could this be the shape of things to come? http://tipnut.com/grill-shrimp/
Carry on and look at my last posts, need new names and feedback....
Wednesday, 7 April 2010
Oh My Goodness - Fab new soap evolving!
Yup, another one that is Palm free, think I must be on a roll now. This is a soap I have been wanting to make for a long time, tried a couple of times and it did not work, but too busy to keep going. Finally decided to try and crack the Salt Bar soap - Why you might ask... well we all know how health giving and healing salt can be, it makes a fantastic bar of soap, I have used 75% natural, Portuguese sea salt in this trial batch along with lots of coconut oil and Castor oil for bubbly properties. Its still very young - some bits hard, some bits very sloppy out of the mold - but has now hardened up beautifully. Its like polished marble. I have been using some already and it it bubbly, and lovely, scented with peppermint and eucalyptus essential oils - really fresh and invigorating.
Well, I need a name. I am hoping that eventually this soap could be part of a new Portuguese soap range - have come up with lots of really naff names (Sea Breeze - see below) but need something that says it all, Atlantic coast, white icing sugar sand, lots of wild waves, very cold sea....... can you help? have a look at the pics and let me know what you think, all comments gratefully received
A close up of the top of one bar, shows the seasalt embedded in the top
Another picture of a collection of bars
HELP! I would really love a name that reflected everything I am trying to convey, Summer holidays, Beautiful coast, surf, fab sandy beaches etc.
A really great prize available to the best name......................
Thanks, in anticipation
Well, I need a name. I am hoping that eventually this soap could be part of a new Portuguese soap range - have come up with lots of really naff names (Sea Breeze - see below) but need something that says it all, Atlantic coast, white icing sugar sand, lots of wild waves, very cold sea....... can you help? have a look at the pics and let me know what you think, all comments gratefully received
A close up of the top of one bar, shows the seasalt embedded in the top
Another picture of a collection of bars
HELP! I would really love a name that reflected everything I am trying to convey, Summer holidays, Beautiful coast, surf, fab sandy beaches etc.
A really great prize available to the best name......................
Thanks, in anticipation
Tuesday, 6 April 2010
FINALLY!! A PALM FREE SOAP THAT I AM REALLY PROUD OF
Yes folks, after trying out lots and lots of different recipes as well as trying to source a good sustainable supply of unrefined Palm oil things have moved on. I have hit on a recipe that I am really thrilled with. It uses lots more olive oil so, while that is great for your skin, it does mean the soap is a lot softer getting it out of the mold and cutting it up, in fact it was really sticky and I did have to force myself to keep going. 3 weeks later it is already lovely and hard, a gorgeous golden colour and it smells wonderful. I just hope the scent lasts as its citrus based, I used lemongrass, sweet orange and grapefruit essential oils, together they are fab.
I have used full fat, really fresh local goats milk from my favorite supplier Norsworthy Dairy Goats http://norsworthydairygoats.blogspot.com/ and that has just added to the wonderful creamyness of this soap. It really is great and while I will still be looking for a good source of sustainable palm oil the rush is over. If customers like this soap I think I will slowly change all my range to this blend.
The soap will be ready for sale soon and up on the website within a week or so.
Wednesday, 31 March 2010
A brilliant blog for you to have a look at!
Its not often that I'm lost for words but this blog is hilarious, I don't think anyone can look at it without laughing out loud - really....... http://cakewrecks.blogspot.com/
I absolutely promise you will love this - and keep going back for more. Let me know what you think?
Tuesday, 30 March 2010
EASTER BUNNIES
I just made two for Lola, they are soooo nice, it was lovely to sit in front of the fire sewing instead of making soap!!! sometimes its nice to do something different. I bet my lovely niece Amaya in San Diego makes one - she is so good a sewing. Let me know Amaya if you do make one......... Any of you let me know and send me pictures of what you have made. I will post mine after Easter Sunday when I give the two I have mad to Lola!!
Monday, 29 March 2010
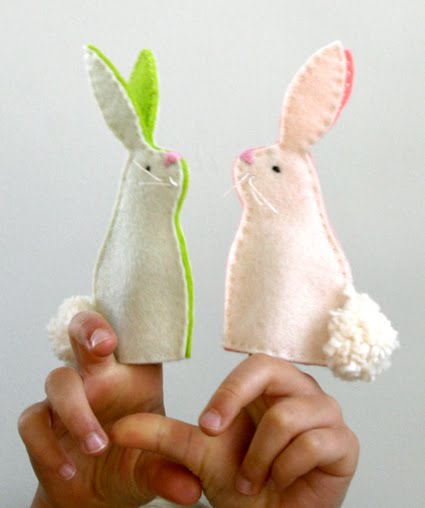
MAKE THESE TOTALLY CUTE BUNNIES FOR EASTER
I love these really sweet bunnies, Thanks to Purl Bee for the idea http://www.purlbee.com/
They are so easy to make, Im definitely going to get sewing this week to make a couple for Lola.
Aimee has done so well while we have been away in Portugal, looking after the mail order side of things and generally keeping it all going. I came back so inspired after a mammoth soap make with my mate Shelly. We made 300 bars of rose bud soap for a ladies only Portuguese night out, it was their 25th anniversary so a bit special and they wanted something pink and lovely to give as gifts. It was our first big Portuguese order, hopefully the first of many. Anyway, sorry for being so lax with the blog lately, just came back to so much work I had to get on top of that first. By the way, just to let you know, click on the facebook link on this page to find out about my latest offer for facebook fans, worth it if you like bubbly goats milk soap.
So get sewing guys! speak again soon.

Using the template cut two bunnies from the white felt and two from one of the bright colors.

Sandwich all four pieces together with the two white pieces on the outside and the two bright pieces inside. Pin them together.
Starting at a bottom corner sew through all four layers right along the edge with a small running stitch.

Sew in this manner along the first side stopping at the base of the ear.

Divide the felt into two ears each consisting of two layers of felt (one white and one bright color). Sew through only the first ear along it's edges. Leave the other ear unsewn for now.

Resume sewing through all four layers of felt once you get back to the head of the bunny as shown above.

Keep sewing in this manner until you get to the bottom edge of the body.

Open up the bottom of the shape so the bright felt is on the inside of the opening. Sew through only two layers (the white and the bright felt) of the bottom edge of the puppet. Then continue on sewing along the opposite side through just the other two layers. This will form the finger opening.

Once you're done sewing the body sew the second ear together along the perimeter with a small running stitch.

The Bunny's body is now done and ready to be embroidered.

Draw a face on the bunny as shown on the template.

Using the pink embroidery thread and a satin stitch embroider the nose.

Embroider the eye with a couple of back stitches.

To make the whiskers: Tie a little knot leaving an inch long tail in the cream embroidery thread. Pull the thread though one of the whisker markings.

On the opposite side wrap the thread once around the needle. Pull the needle through this wrap, forming a small French Knot, and then trim the embroidery thread.

Repeat this for the two other whiskers and trim them so they are all about the same length.
Spray the puppet with water to get rid of the fabric marker markings.

Wrap the cotton yarn around two of your fingers several times.

Pull this gathered yarn off of your fingers and wrap the yarn around the middle of this gathering tightly and tie a little knot.

Cut the loops to form a pom pom.

Trim the pom pom so it's fluffy and round.

Using the cream colored embroidery thread sew the pom pom tail onto the puppet.
They are so easy to make, Im definitely going to get sewing this week to make a couple for Lola.
Aimee has done so well while we have been away in Portugal, looking after the mail order side of things and generally keeping it all going. I came back so inspired after a mammoth soap make with my mate Shelly. We made 300 bars of rose bud soap for a ladies only Portuguese night out, it was their 25th anniversary so a bit special and they wanted something pink and lovely to give as gifts. It was our first big Portuguese order, hopefully the first of many. Anyway, sorry for being so lax with the blog lately, just came back to so much work I had to get on top of that first. By the way, just to let you know, click on the facebook link on this page to find out about my latest offer for facebook fans, worth it if you like bubbly goats milk soap.
So get sewing guys! speak again soon.
Cutting

Using the template cut two bunnies from the white felt and two from one of the bright colors.
Sewing

Sandwich all four pieces together with the two white pieces on the outside and the two bright pieces inside. Pin them together.
Starting at a bottom corner sew through all four layers right along the edge with a small running stitch.

Sew in this manner along the first side stopping at the base of the ear.

Divide the felt into two ears each consisting of two layers of felt (one white and one bright color). Sew through only the first ear along it's edges. Leave the other ear unsewn for now.

Resume sewing through all four layers of felt once you get back to the head of the bunny as shown above.

Keep sewing in this manner until you get to the bottom edge of the body.

Open up the bottom of the shape so the bright felt is on the inside of the opening. Sew through only two layers (the white and the bright felt) of the bottom edge of the puppet. Then continue on sewing along the opposite side through just the other two layers. This will form the finger opening.

Once you're done sewing the body sew the second ear together along the perimeter with a small running stitch.

The Bunny's body is now done and ready to be embroidered.
Embroidering the Face

Draw a face on the bunny as shown on the template.

Using the pink embroidery thread and a satin stitch embroider the nose.

Embroider the eye with a couple of back stitches.

To make the whiskers: Tie a little knot leaving an inch long tail in the cream embroidery thread. Pull the thread though one of the whisker markings.

On the opposite side wrap the thread once around the needle. Pull the needle through this wrap, forming a small French Knot, and then trim the embroidery thread.

Repeat this for the two other whiskers and trim them so they are all about the same length.
Spray the puppet with water to get rid of the fabric marker markings.
Making the Pom Pom

Wrap the cotton yarn around two of your fingers several times.

Pull this gathered yarn off of your fingers and wrap the yarn around the middle of this gathering tightly and tie a little knot.

Cut the loops to form a pom pom.

Trim the pom pom so it's fluffy and round.

Using the cream colored embroidery thread sew the pom pom tail onto the puppet.
Subscribe to:
Posts (Atom)